Vape Tank Maintenance: Everything You Need to Know
The vape tank, otherwise known as the cartomizer, is one of the most vital components of the device. It’s the vessel that houses the e-juice and atomizer (coil), and without it, your vape would be useless.
Because your unit relies on it to operate properly, your vape tank gets plenty of use and can quickly become dirty or taxed, which will affect flavor, performance and overall vaping experience. Therefore, you need to make sure you’re keeping it clean and gunk-free with some periodic maintenance. Smoking Vapor is here to help you enjoy your vape tank to its fullest so it perseveres for many thousands more puffs.

When to Clean Your Vape Tank

The tank — which is also known as the cartridge or pod when talking about compact and portable pod vapes — is where your e-liquid is stored until it’s vaporized by the atomizer, which is usually housed within the tank. As with any vape part, the vape tank can become taxed with constant use. But unlike your device’s battery and other components, the tank and coil constantly come into direct contact with the e-liquid, which means they get dirtier and gunkier faster than other parts. So when should you clean them?
There are a few main signs you should look for to indicate that it’s time to give your tank a bath. First, if you notice a less intense, burnt or stale flavor, it’s probably a sign that the reservoir has some built-up juice that’s affecting the taste and it’s time for a deep clean. You may also notice that the tank appears dirty or has visible residue on the walls and the coils. If you think it’s time to replace the coil head, you can take it as a sign to give your entire unit a quick clean. Many vapers clean their vape tanks when they replace their coils, and this is a great habit to get into to ensure that your device is always in tip-top shape.
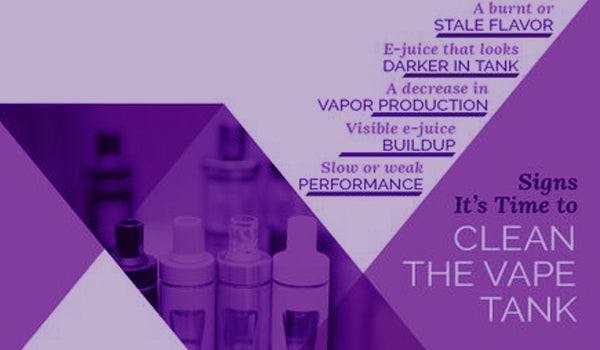
Signs It’s Time to Clean the Vape Tank

For heavy vapers, it’s best to clean your vape tank once a week with a quick rinse. For moderate vapers, clean at least once every two weeks. This is about the same frequency that experts recommend replacing the coil, about every two weeks. All vape users should punctuate their quick cleanings with a deep clean — using the dish soap method outlined below — once a month or more. If you still aren’t sure, look for the following signs before you bust out the dish soap and toothbrush:
- A burnt, stale or unpleasant flavor
- A decrease in flavor over time
- A decrease in vapor production (dry hits)
- Visible e-juice buildup on coils or tank
- E-juice that looks darker in the tank
- Slow, weak or inconsistent performance

How to Clean Your Vape

All vapes are different, so you should always clean your devices based on the instructions from the manufacturer, if they are provided. However, in general, you can use the following directions to clean most vaping devices with a tank. In addition to cleaning off surface debris, the cleaning process also includes replacing the vape coil with a new one. Coils are affordable parts that usually cost just a few bucks each, and they are well worth the investment to keep your vape operating at its best and puffing the best-tasting clouds possible.
What You’ll Need:
- Warm water
- Dish soap
- A cleaning brush or toothbrush
- A new vape coil

There are a few different ways to clean a vape tank. The first is the periodic rinsing method, which should be completed at least once a week and definitely every time you change your vape’s coil head. The next two are deep-cleaning methods that should be performed once a month or every couple of months to take care of those particularly stubborn deposits that can significantly alter the vape’s performance and flavor. Some people recommend using isopropyl (rubbing) alcohol to clean vape tanks, but we caution against this because the substance can be toxic and because it takes longer to dry, which can cause long-term damage.
- Periodic Rinsing Method — Before beginning, disassemble the device. First, take the device apart. Pull off the drip tip, remove any gaskets and open the tank. Once all the pieces and parts are disconnected from one another, thoroughly rinse each piece under warm water individually. Allow each piece to dry completely before installing the fresh coil and reassembling all the pieces. Drying is a vital part of the cleaning process no matter which method you follow, as using a damp or wet tank can permanently damage parts of your device and negatively affect the vaping experience.
- Deep Cleaning: Dish Soap Method — For this method, start by disassembling the vape completely following the instructions in the periodic rinsing method. Rather than rinsing the components under hot water, you’ll want to let them soak in a bath of warm water mixed with dish soap to help break up those stubborn e-juice deposits. Let soak for 10 to 15 minutes and use a gentle cleaning brush to release any buildup. Rinse thoroughly and allow to completely dry before replacing the coil and putting the parts back together. Note that leaving the vape parts in the water for too long can cause them to rust or corrode, so make sure you limit the soaking period to 15 minutes or less.

Maintenance 101: How to Store Your Vape

Interestingly, the way you store your vape and vape juice actually has a lot to do with how well it performs and how often the parts need to be cleaned or replaced. Be sure that you store your vape and all its individual pieces and parts in a manner that prevents damage caused by drops, dust buildup, extreme temperatures and exposure to harmful substances. Here is some more information on how to store your vape.
- Refer to the User’s Manual — The best vapes will come with detailed user’s manuals providing in-depth instructions on how to use, maintain and store your vape device. It’s important that you follow the manufacturer’s directions to be sure you account for any special considerations and so that you don’t void the warranty. Usually, the manual will suggest storing your vape somewhere cool and dry when it’s not in use.
- Protect it From Damage — The worst thing you can do to your vape is drop it or expose it to impact. Frankly, it’s made of somewhat fragile parts that, if broken, will need to be replaced or could compromise the device entirely. Try to avoid storing your vape in places that could expose it to damage, like in your purse or pocket without a protective case. Pick up a soft, zippered case that safely holds all your device parts and accessories while you’re not using them.
- Store Your E-Juice Properly — Did you know that the quality of your e-liquid can actually affect the performance of your vape device? Storing your juice in extreme heat or cold can change the consistency and quality of the liquid, which can put undue strain on your vape’s fragile parts and components, especially the tank and coils.
Signs It’s Time to Upgrade Your Tank

One of the things experienced vape enthusiasts love about the art of vaping is that it’s amazingly customizable. Tank broken or under-performing? No big deal. Simply replace it with an upgraded version. Grabbing a fresh, new tank and coils makes your device feel brand-new and can even simplify the cleaning process.
Before you shell out for a brand-new vape tank, make sure that it’s not just the coil that needs replacing. As we’ve mentioned before, an old or worn-out coil can be to blame for many vaping issues, especially less-than-ideal flavor and performance. This is why we always recommend replacing the vape coil head while performing a tank clean. If you’ve already done the requisite coil replacement and cleaning and still don’t see measurable improvements, it may be time to upgrade to a new vape tank. Sometimes your tank is too far gone. In those instances, it’s best to replace the tank entirely.

- Despite Cleaning and Replaced Coils, Flavor is Subpar — Have you noticed that, even after upgrading to new coils, your vape simply doesn’t seem to be pulling the same great flavor that it once did? This is a sign that there are liquid deposits trapped within the vape’s tank that can’t be removed with a simple cleaning or coil swap-out. Before you purchase a new vape tank, make sure to replace the coils and give your vape a deep clean using the dish soap .
- E-Juice Appears to Change Colors — The same trapped deposits that are responsible for affecting your vape flavor experience are also responsible for giving e-juice that gross, darkened color. What’s happening here is that the residue and build-up is mixing with the fresh juice, causing it to darken in color and affecting the taste. Beware the cloudy, brown liquid that not only looks disgusting but tastes horrible too.
- Your Tank is Leaking Precious Liquid — This is a rather obvious one, but one that many vape enthusiasts surprisingly let go for too long. Vape tanks are fragile and prone to cracks, which can cause the liquid to seep out over time. If you feel that your liquid is running out quickly or you can identify leaks, it’s time to replace the tank. NEVER attempt to repair your tank with glue or tape that could introduce harmful toxins into the vapor that you inhale.
- Your Tank is Outdated — Many old vape tanks work just fine, even if they’re several years old, so we’re not suggesting that you simply go out and buy a new one every time something better comes onto the market. With that said, there is a massive leap from some of the earliest vape tanks on the market to those that are available today, so if you’ve been sticking it out for a while, you’ll be really impressed to see the new features on the latest tank models.

Premium Vape Tanks and Parts

If you’re in the market for top-of-the-line vape tanks, replacement coils and other parts and components that keep your vape in pristine condition for many thousands of satisfying pulls, make Smoking Vapor your go-to resource. We’re more than happy to help pair you with the perfect vaping device for your unique needs, desires and budget. Whether you’re in the market for an ultra-compact vape pod, full-flavored e-juice or affordable parts and accessories, you’ll find just what you’re looking for in our vape shop.


Leave a comment
This site is protected by hCaptcha and the hCaptcha Privacy Policy and Terms of Service apply.